Simple Delights

Tuesday, 21 January 2014

Coconut Egg Rolls ( Kuih Kapit ) Aka Love Letter


Just cant have enough of all the Chinese New Year goodies. Please understand here in Australia we do able to grab everything ( almost everything) from our home country. But talking about home made vs machine mass production . I do prefer home made with love and knowing what is the ingredient put in the food we ate.

Ok, to fulfill my own satisfication of having all the CNY goodies I love , I got to be the one who home made the goodies I love. One of it , is this traditional goodies we all love in Malaysia and often store in Milo tin. If you are part of the family , your will have a milo tin as a token as CNY goodies from family member who make it that year.

I knew the traditional way of making this , sitting infront of a roll of  charcoal using a metal mold and have to look after each plate you put on the charcoal . If it get burnt, well you will get a scolded from the elder. I dont really have an experience on that. So I probably will not know how to do it. With the technology now, it is a pleasant experience to make this.

Here are the recipe I follow from this link ->Cheryl Marie Cordeiro.

Ingredients :

400 ml of canned coconut milk
5 eggs
150 g caster sugar
150 g rice flour
90 g plain flour

Method :

1.Beat the egg with sugar till sugar resolve .
2.Pour in the coconut milk , combine well .
3. Sift in the flour and mixed well.
4. Heat up the machine as per mannual
5. Place 1 table soup ( western soup) of batter in the machine and press it hard if you prefer a thin layer.
6. When is done , either roll it as a roll or fold it as a triangle shape.


I simple love the coconut milk fragrant in this biscuit and it did bring back all my good childhood memory. My cousin used to make this and we always got a tin from my auntie. Bear in mind , my cousin was a boy then, I admire his patience. I guess this is how Asian family show love and appreciate to one another. We seldom express love verbally often we show love in giving things that we make from home . So we do love to share food during all festival.


This season for all those who celebrate this festival , I wish you Prosperous Lunar New Year, good health and dreams come true in this Horse year.


Wednesday, 8 January 2014

Pineapple Tarts


After welcoming 2014 , is time to prepare for another big festival of the Chinese . Lunar new year will soon be coming . This year it seem earlier than the usual date , the Chinese New Year( CNY) will fall on 31/01/2014. Most of my friends has planned to go back home for celebration . As the new year fall close with Australian Day ( 26/01/2014) is good to take some holidays and have a public holidays in between. Well, I hope is not a too lonely year for us who are "left behind".

This year I want to be more prepared than last year. So I have decided to start my baking of CNY cookies earlier and plan to sell it for a good start of my year 2014.

A lot of the friends has express their interest in this lovely goodies - Pineapple Tarts. This is my no 1 top love of the CNY cookies. We used to place order and from the best famous Malacca style pineapple tart. Only after making it myself I understand why this cookies is always the most expensive and at time one tarts can reach the price of $1.50 each. Not only is time consuming and the delicate of handling it require patience and again time .

I have make a batch of 81 pieces with the following recipe and would like to let my friends try out and see do they love this version and taste.

The recipe I used is from ->Table for 2 or more


I follow the pineapple jam recipe from hers as well ->Homemade-pineapple-jam

Yes I make everything from original and would love to provide the best natural ingredients in all I bake.


The recipe of Pineapple tarts dough is as below:

Ingredients :

250g Unsalted Butter
170g Cream ( Pouring Cream/Whipping cream)
50g   Cream Cheese
3 egg yolks
400g Cake Flour
30g Corn Flour

1 large egg yolk + 1 tablespoon of milk for egg wash.

Method :

1. Cream butter, cream cheese and sugar in a mixer. Till well combine
2. Pour in the cream and continue to mix in medium speed, scrap down the side from time to time. It might look lumpy at the beginning it will all combine well together as you continue your beat.
3. Beat in egg yolks for 1 minutes.
4. Sift the flour together and pour in half to the above mixture and continue to beat till combine and pour in the reminding flour and make sure is combine well but not over mix.
5. Let the dough sit for 10 min before handling it and wrap with the pineapple jam that has been roll in ball.
6. Gentle wrap the pineapple tart in this dough and brush with egg yolk wash .
7. Preheat oven to 165C , and bake the pineapple tarts for about 20min till golden brown.


Pineapple Jam

Ingredients :

1kg pineapple flesh
1 1/2 cup of brown sugar
1 small piece of cinnamon stick

Method :

1. Blend the pineapple flesh till fine ( is good to leave some fiber in )
As mention in Table for 2 or more recipe, include the core of the pineapple does make it more juicy and add fibre in the jam texture.
2. Pour all the blend pineapple in a deep base wok/pot and start to cook in medium heat.
3. When the pineapple started to dry up and like thick oatmeal, gentle pour in half of sugar and continue to cook in low heat.
4. Stir occasionally and make sure no burning of jam in the bottom.
5. When the water reduce to 80% pour in the reminding sugar, and stir every 8 min.
6. When the pineapple jam is cooked to your liking consistency , off the fire and let it cool down .

Is easy to handle the jam after chilled  in a fridge.

The post written by Wendyikk is very helpful and details. Do used her blog for more details information.

Happy baking and I do hope this will be well received by my friends or customers :)


Wednesday, 1 January 2014

Rainbow Cake


December is a month full of celebration . My birthday fall in the month of December. But this is not the only celebration we do in end of the year. Follow by Christmas and jumping into new year. Is always a month have lots of celebration .

I make this cake first for my own birthday. The interesting thing is , I have started my baking "business" ( cant really consider as full business but I bake by order from friends who want cake for any occasion ) . So my friends order a cake from me for my birthday . Wahahaha!! Reason given - " we cant find a cake that you will like. So we will pay you to bake a cake for your birthday party. "

Well I did not complain , afterall I got to experiment and get to pay for it. In Australia it does has a culture to bring your own cake to the office and celebrate with your colleague. ( Do not ask me why, I can not figure out the reason as well ). So I treat this as an honor and there was this cake I would always love to try out - Rainbow cake !!!!

I look for the recipe and mostly is all using coloring. NOPE this is not what I prefer my cake to be. So when I find this ->Peng's Kitchen. I am happy to use this recipe and adapt to the ingredients I can find in Australia.

Hereby this is the cake I have make and right after my birthday I have an order from a lovely husband who want a colourful cake for his lovely wife. So I did make the 2nd Rainbow cake and improve a lot from my plain decoration version.

My recipe as below :

Natural Colourings :

Ingredients
Red : 2 Tbsp of cherry puree + 1 little drop of red velvet color ( Is difficult to get the red )
Plain yellow : 1 egg yolk + 1 tbsp milk
Orange: 2 Tbsp of mango puree
Green : 2 Tbsp of pandan juice or 1 tsp of pandan essence
Blue : 2 Tbsp of blueberry puree + 1 tsp of lemon juice ( a tiny drop of blue color, as blueberry tend to become purple)
Purple : 2 Tbsp blackcurrant puree +2 tsp of lemon juice
Chocolate : 1 Tbsp of cocoa powder + 2 Tbsp of hot water ( Mix and dissolve)

White Velvet Cake ( I have added half portion of the original recipe)

660g Plain Flour
3 tsp baking powder
1 tsp baking soda
300g sugar ( original should be 375gm)
90g butter
2 tbsp oil
3 egg white
375ml milk
188ml natural yogurt
3 tsp vanilla paste

Method
1. Cream the butter with oil and sugar till white and fluffy. ( It take about 2min)
2. Add in the egg white and beat till well combine
3. Mixed the vanilla, milk and yogurt well in a bowl.
4. Sifted the flour with baking powder and baking soda.
5. Add in the liquid ( step 3)  and flour alternately in step 2 . Be careful not to over mix.
6. Preheat Oven at 160C
7. Divide the cake mixture into 7 portion by having  3/4 cup batter into separate bowls and mix in natural coloring into each bowl.
8. Pour the batter into a 7" round pan and bake for 15min or until the toothpick inserted come out clean.
9. Take out the cake leave it to cool (5min) and use a thin knife go arout and the cake pan and have the cake out and cool on rack.

I bake 2 cake at one time as I happen to have 2 mould. It help to shorten the time of the baking.

After finished all the baking , make sure the cake cool down before frosting.

I frost one of the cake with strawberry Italian Merigue Buttercream and anoather with blueberry Italian Merigue Buttercream. For Italian Merigue I am using the recipe from ->Cake Journal

Decorate the cake with your favourite fruit , I used cheeries & blueberry . Simply love the look of this cake and the height of it. The cake did bring a "wow" factor after one slice was being cut out. However the cake is not as moist and soft as I would love to. I will try other cake base and see what it will bring next time when I bake this again .

Rainbow always mean something speacial to my heart, as it remember GOD's promise for me and my dear one on our wedding. At time things get tough and life is not always easy , I bake this cake to remind myself GOD's goodness in this season and trust HIM will bring a more of HIM 2014 in our life again!

Happy New YEAR !!! May GOD blessings fall upon you and the love one in 2014 . You will be a great blessings to those around you .

I am submitting this post to Baby Sumo's Christmas Recipes Collection 2013 event which is hosted by Baby Sumo of Eat Your Heart Out.

Remember every cloud has silver lining and rainbow always come after storm !!


P/S : The picture in this blog is taken by a talented brother. Really love how it make the cake looks so like magazine picture.

Thursday, 19 December 2013

3D House Cake


A child laughter is always a happy song singing to our ears . You will not get bored or annoy by it. Therefore hanging around with children make you felt younger and indeed help you stay energetic.

It is my god daughter 1 year old celebration. Kid just grow faster than we can imagine. It is always honor  to celebrate birthday together as a family :)

I want to bring something special for her party. Got the permission from the parents to bring a cake for this special occasion.( Just in case they would like to order something special for their precious baby)

I do not dare to promise anything. Though I know this is the cake I would like to make - House Cake.I saw this cake last year from the blog. Have been looking for an occasion I can make this cake and not to eat it by myself ( it is not wise to eat a whole house of cake ^^) . However not knowing how well I will success in making this cake. I just told them hopefully it will be a surprise.

I follow the link ->Cook.Bake.Love and appreciate the blogger of sharing what they have learn and how to improve the cake decoration . She is good in doing the decoration , I hope I can have such skill :)


So here is how to build the house ..

Ingredient :

1 piece of  8" butter cake with 2" height.
( I used NGSK butter cake ->Zebra Butter Cake)

1 piece of 10" pandan sponge cake 1.5" height
(I used one of the swissroll chiffon cake base ->Yam Taro Paste Swissroll)

Cream frosting :

For frosting the house in between the layer

Blueberry Cream

100g Blueberry ( I used can blueberry as I need to juice )
250g Pouring Cream ( Whip to stiff peak)

Method :
1. Puree the blueberry and press through the sift .
2. Mixed the fine puree with the whipping cream.

For outter layer of  the house

Strawberry yoghurt cream

Ingredient

300g Strawberry Yoghurt
300g Pouring Cream ( Whip to stiff peak)
2Tbsp Gelatin
4Tbsp Water

Method :

1. Put the water in a bowl and sprinkle gelatin in it. Mix well and place in a bowl of hot water to have it melt.
2. Whip pouring cream till stiff peak.
3. Pour the melted gelatin into the strawberry yoghurt and mixed well.
4. Fold the whipping cream into the strawberry yoghurt mixture.


Chocolate cream ( for the house ground)

Melt 10g of dark chocolate ( double boil)
Mix with 100g whipping cream

To make the grass - Desicated coconut mix with some pandan ecessene.
Candies , green grapes , raspberry , biscuits , anything you think your kids will like.

Housing making step :

1. Level bthe butter cake and cut into precisely half.
2.Spread the blueberry cream ont he half of the butter cake and place it on top of the other buttercake.
3.Divide this cake into 3 equal portion. , cut out 1/3 ( be precise as you can )
4.Lift up the 1/3 portion of the cake to standing position , cut diagonally into 2 triangles.
5.Place the 2 triangle together to form a roof and join them with the blueberry cream.
6.Place the roof on top of the remaining 2/3 of the cake. Joint together with blueberry cream. Now the house has been form ^^.
7. Spread the chocolate cream on the sponge cake, place the house on top and position as your preference.
8. Spread strawberry cream to cover the house and cream as smooth as possible and start to decorate the house to your liking or the liking of the litte one.

e

I love to have fruit on my cake and try not to put too much of candies. So I build the house with green grapes as path leading to the door and have a bush of raspberry as roses and green grass. I have little princess & horses candies. Afterall is still a little girl cake.

Beside making a ginger bread house this year, maybe can try to do a house cake as a beautiful dessert. If you have the little one I am sure they will love to decorate the cake with you.

Hopefully this cake will bring a surprise on the christmas dinner. Wish you all a merry christmas and blessed new year 2014 ^^


Sunday, 8 December 2013

Ladybug Steam Cupcake

Well is the time of year , where everyone is rushing to get pressie, prepare food , arrange for holidays .  To want to end the year more foodfull , and have the celebration mood to journey forward to New Year.

Staying in western country, Christmas is a big event for everyone. In US the celebration kick start from thanksgiving in November till the new year. I used to fantasy on how Christmas will be celebrated in western country. The movie seem to project such romantic event with the love one and snowing whole days, nights and months.  Well, sorry Australia is summer during Christmas . How people celebrate Christmas in this country is not romantic at all. Is very family , we tend to have BBQ at the back yard and beers and hot hot weather.  So maybe should a white Christmas will make some different ? Not sure has yet to experience it.

I try not to get too involve on getting present and eating ourselves silly as years goes by. Honestly that is lot of time the present we give or get might not be the one people like. All the people I knew of, are very blessed and have house full of things . This should be a season to bless those who really in need. So I want my Christmas to be one that is give to the needy not to top up others store room .

Every year my church will have an event for the children to know the true meaning of Christmas->Christmas for Kids ( C4K). This event has run for 10 years and we really want to bring the love of GOD to community that has struggle or needs in life.

So I participate in baking Cupcake for the little one. I found this recipe from the website , which I knew the children surely will love the print on this cake . I hope by enjoying the cupcake it will bring some joys to this special day for them .

The recipe I used and modify  is from ->My Little Favourite DIY

Ingredients :

3 Cold Eggs
275g Plain Flour
3 tsp baking powder
150ml Fresh milk
1 tsp ovallette ( I cant find this in Aus, I replace with 1/2 baking soda)
220g Castor Sugar ( can be reduced)
1 tsp vanilla essence
1-2 piece of dark chocolate ( melted by double boiling )

Method :

1) Place the egg and sugar in a mixing bowl , beat till fluffy and creamy , reach ribbon stage
2) Mix in 1/3 of the flour in the egg mixture till combine, pour in 1/2 the milk portion. Follow by another 1/3 of flour then 1/2 milk portion and finally pour in the reminding 1/3 flour in the mixture and combine well.
3)Take 1 Tbsp plain mixture and put into a piping bag
4)Take 3 Tbsp plain mixture , mix with dark melted chocolate and put into pipping bag .
5) Colour the rest of the mixing with bright red and put into a piping bag
6) Pump the red color mixture into the cup about 80% full .
7) Draw a cross with the chocolate mixture and do dots on both sides. Color the upper half of the cross with chocolate mixture.
8) Make 2 plain dots as eye and filled 2 small dots in the plain mixture as eye balls.
9)Steam with medium high heat for 10-12 min. Remember to cover the steamer lids with tea towel. You do not want the water condense to drop onto the cake.


As I do not know how should the texture and the taste of the cake with ovallette inside. Is hard for me to know what I did is successful or the cake should be more moist then this.

I do a pre run batch before the actual baking events. And put some strawberry jam in the cake as fillings. However the jam melted and leak out from the bottom of the cake and make it wet . Where I omit the jam but instead filled with some chocolate chip instead..

The cake is moist and is not as chewy as I thought it will be . The texture of the cake is sort of like chinese fa kueh. Thank GOD the texture is not like the chinese style steam cake.

What is the let down when I did that for the big batch. The cup cake liner I used seem to be bigger which I do not notice it. Until I start steaming the cake it takes longer than my pre run. The cake folor fade and some of the print fade as well.


Lesson learnt - Do not fill it too full , as the longer the heat to steam it will cause the color fade and the cake will surely crack! Is a hard lesson , but I will be more careful next time when it come to cake steaming.


Saturday, 16 November 2013

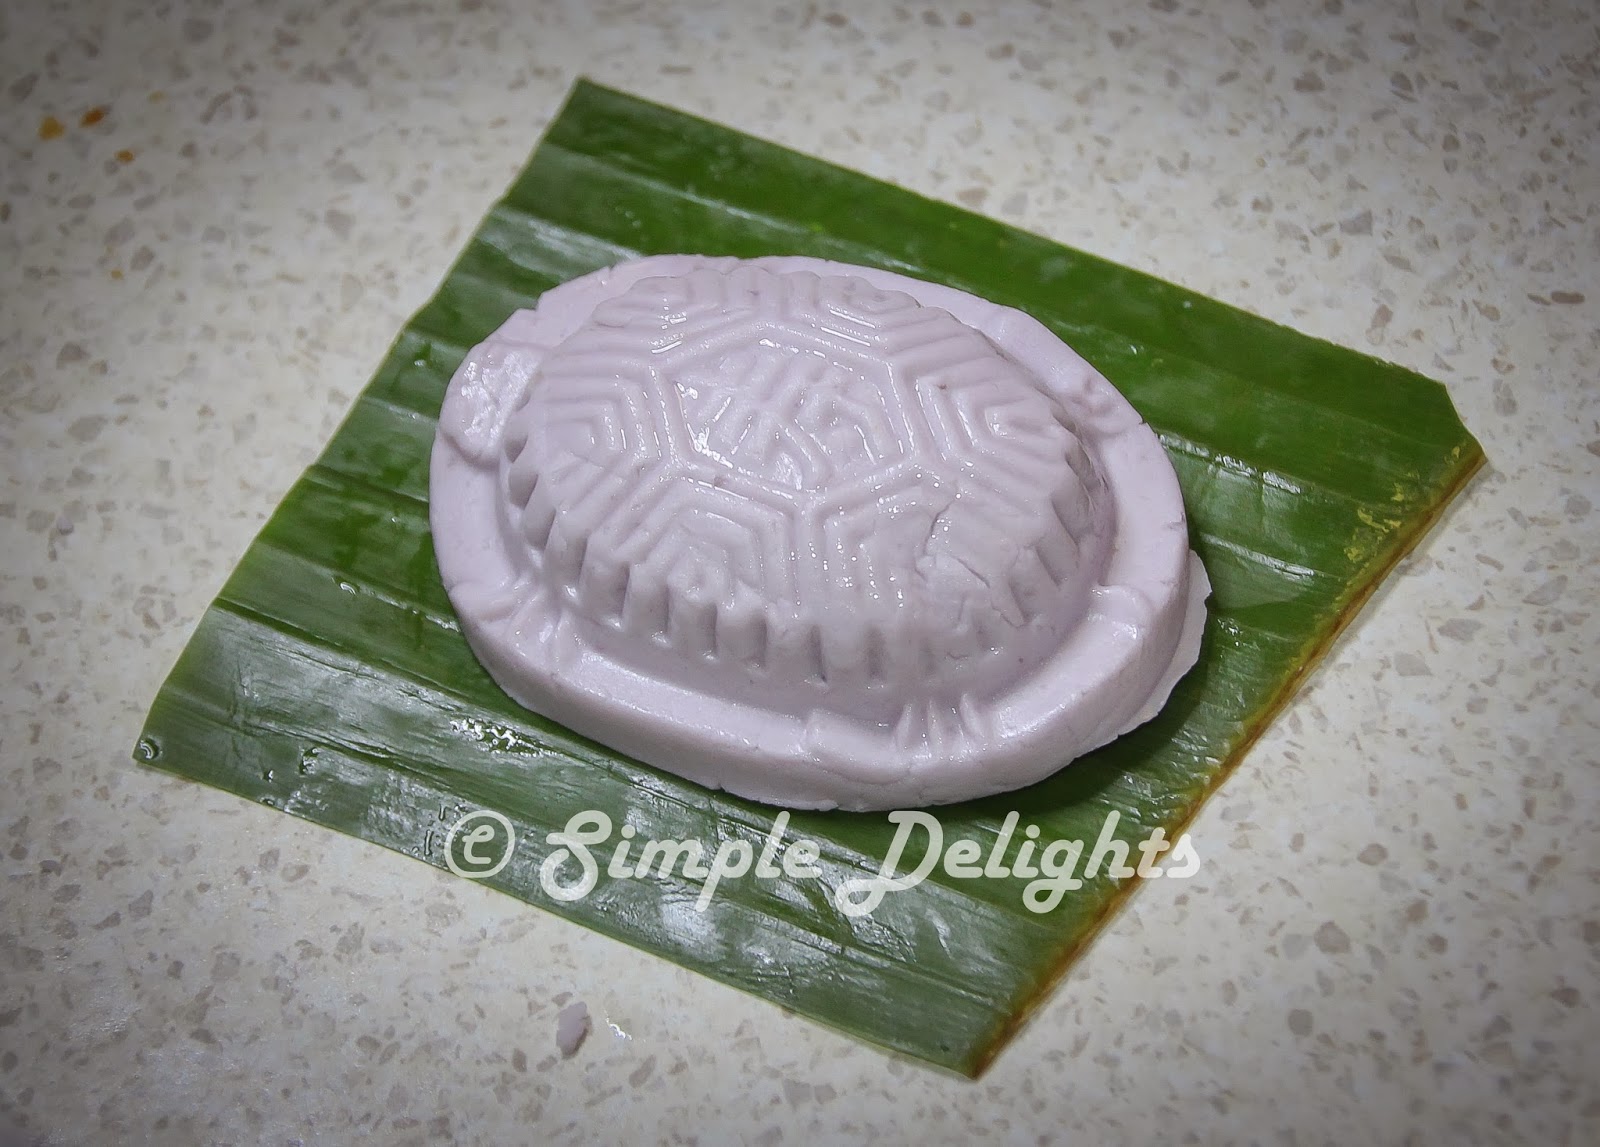
ANG KU KUEH ( Purple Sweet potato)


I love all type of Nyonya Kueh . Is not from my heritage. However staying in Asia we do have different mixed of cultural group staying harmony together. Peranakan is another cultural group with full of strong favour taste of food and snack.

Ang Ku Kueh is one of the snack that is our tea moment snack. It has many version and filling. For this snack I love the peanut fillings. Some recipe will iincorporate coconut milk in it. Which will really enhance the fragrance of this kueh and trust me everything that has coconut in it taste the best.

There are so many Ang Ku Kueh recipe in the internet and for this recipe I follow this link -> HoneyBeeSweets.


Purple Sweet potatoes Kueh

Ingredients

100g Purple Sweet potatoes
150g Glutinous Rice Flour
1/2 Tbsp Rice Flour
1 Tbsp Sugar
1.5 Tbsp cooking Oil
100ml Water or Coconut milk ( I used coconut milk)

Method :

1. Place all ingredient expect coconut milk in a large mixing bowl.
2. Slowly add in the coconut milk to the form a soft dough ( not wet). Cover it with cling wrap and rest for 10min.
3. Divide the dough into small portion and gentle press it flat on your palm.
4. Scoop the filling in the center and seal it. Roll it into a ball shape.
5. Press the dough with filling into the mold grease with oil.
6. Knock the kueh out from the mold and place it on top of a banana leafs.
7. Preapare a steamer and steam the kueh for 6-8min. Depend on the size of the kueh.
8. When the color of the kueh turn lighter it indicate the kueh is cooked.
9. Take it out from the steamer and cool it .

Peanut Fillings

Ingredients

350g Peanut ( The peanut I bought is without skin)
60g Caster sugar

Method :

1. Roast the peanut in oven for about 20min in 180C .( You can slowly pan fired the peanut till roasted)
2. Blend the peanut with the caster sugar.
3. Let it cool down before used for fillings.


As I grease the mold with oil , I did not brush oil before steaming the kueh. You can brush the kueh with oil before steaming it will prevent the kueh from sticking together and make the surface look glossy.

The texture of the kueh is soft and the coconut milk add frangance and it taste yum. I simply love the nature purple from the sweet potatoes. It make this kueh more appealing and just good for an afternoon snack .


Tuesday, 5 November 2013

Curry Chicken Bun


Another bread moment. I am looking at recipe that is easy and with great result. Baking bread is really time consuming. The time used for proofing and roll and wait for another round of proofing. I am a carb person I must admit. I love rice and really learning to cut down as much as I can . And learn to eat healthy grain .

So this time am looking for an easy and healthy bread recipe I come by this one of the food blogger of my favourite is ->SiewHwei's Kitchen.The recipe has portion the time to proof and interestingly it has a proof dough which was proof in the fridge overnight and added in the main dough on the next day. Well it might be a method some of you had known it for awhile, but again as an ametuer this is the first time I baking bread using this method.

Here are the recipe I have followed :

Ingredients :

Overnight dough (中种)

214g Bread Flour
128g Cold Milk
2g Instant Yeast


Method :

1. Mixed all the ingredient till combine and leave in room temperature to proof for 4-5hours OR
    Leave in a bowl cling wrap it refrigerate 14-16 hrs.

I have this prepare overnight and let the dough sit in the fridge for that long .

Main Dough

Ingredients :

42g Bread Flour
50g Wheat Flour
25g  Milk
30g Whole Egg
3g   Instant Yeast
5g   Salt
35g Brown Sugar
12g Milk Powder
30g Unsalted Butter

Method :

1. Tear the overnight dough into pieces and mixed with all the ingredient in main dough except unsalted butter.
2.  Combine all the ingredient well with mixer using bread hook. Add in butter continue to beat till well mixed and the soft dough has formed. ( Pass through window pane test)
3. Let the dough rest for 10 min. Cut the dough into small portion weighing 40g each portion, roll in ball shape and rest for another 10min
4. Flatted the dough, spoon a tablespoon of curry chicken filling in it. Seal up the dough and roll into ball shape.
5. Line the baking tray and have the bread place in the tray and let it proof for another 60min.
6. Preheat oven 170C.
7. Once proofing is done , brush the bread with egg wash and bake the bread for 10-15min.


As for the curry chicken filling please refer to my -> chicken curry puff.

The bread is soft, however it does stick on my teeth , I wonder is it baking time too short , or this texture will make the bread soft. I guess is healthy to use some wheat flour in the bread. I am looking for wholemeal bread recipe so to have a more healthy version of bread I love to consume.


Give this a try and if you visit the original website for this recipe, you will see she do it all in small batch as tea and snack for her son.

Happy breading again :)

LinkWithin

Related Posts Plugin for WordPress, Blogger...