Thursday, 19 December 2013

3D House Cake


A child laughter is always a happy song singing to our ears . You will not get bored or annoy by it. Therefore hanging around with children make you felt younger and indeed help you stay energetic.

It is my god daughter 1 year old celebration. Kid just grow faster than we can imagine. It is always honor  to celebrate birthday together as a family :)

I want to bring something special for her party. Got the permission from the parents to bring a cake for this special occasion.( Just in case they would like to order something special for their precious baby)

I do not dare to promise anything. Though I know this is the cake I would like to make - House Cake.I saw this cake last year from the blog. Have been looking for an occasion I can make this cake and not to eat it by myself ( it is not wise to eat a whole house of cake ^^) . However not knowing how well I will success in making this cake. I just told them hopefully it will be a surprise.

I follow the link ->Cook.Bake.Love and appreciate the blogger of sharing what they have learn and how to improve the cake decoration . She is good in doing the decoration , I hope I can have such skill :)


So here is how to build the house ..

Ingredient :

1 piece of  8" butter cake with 2" height.
( I used NGSK butter cake ->Zebra Butter Cake)

1 piece of 10" pandan sponge cake 1.5" height
(I used one of the swissroll chiffon cake base ->Yam Taro Paste Swissroll)

Cream frosting :

For frosting the house in between the layer

Blueberry Cream

100g Blueberry ( I used can blueberry as I need to juice )
250g Pouring Cream ( Whip to stiff peak)

Method :
1. Puree the blueberry and press through the sift .
2. Mixed the fine puree with the whipping cream.

For outter layer of  the house

Strawberry yoghurt cream

Ingredient

300g Strawberry Yoghurt
300g Pouring Cream ( Whip to stiff peak)
2Tbsp Gelatin
4Tbsp Water

Method :

1. Put the water in a bowl and sprinkle gelatin in it. Mix well and place in a bowl of hot water to have it melt.
2. Whip pouring cream till stiff peak.
3. Pour the melted gelatin into the strawberry yoghurt and mixed well.
4. Fold the whipping cream into the strawberry yoghurt mixture.


Chocolate cream ( for the house ground)

Melt 10g of dark chocolate ( double boil)
Mix with 100g whipping cream

To make the grass - Desicated coconut mix with some pandan ecessene.
Candies , green grapes , raspberry , biscuits , anything you think your kids will like.

Housing making step :

1. Level bthe butter cake and cut into precisely half.
2.Spread the blueberry cream ont he half of the butter cake and place it on top of the other buttercake.
3.Divide this cake into 3 equal portion. , cut out 1/3 ( be precise as you can )
4.Lift up the 1/3 portion of the cake to standing position , cut diagonally into 2 triangles.
5.Place the 2 triangle together to form a roof and join them with the blueberry cream.
6.Place the roof on top of the remaining 2/3 of the cake. Joint together with blueberry cream. Now the house has been form ^^.
7. Spread the chocolate cream on the sponge cake, place the house on top and position as your preference.
8. Spread strawberry cream to cover the house and cream as smooth as possible and start to decorate the house to your liking or the liking of the litte one.

e

I love to have fruit on my cake and try not to put too much of candies. So I build the house with green grapes as path leading to the door and have a bush of raspberry as roses and green grass. I have little princess & horses candies. Afterall is still a little girl cake.

Beside making a ginger bread house this year, maybe can try to do a house cake as a beautiful dessert. If you have the little one I am sure they will love to decorate the cake with you.

Hopefully this cake will bring a surprise on the christmas dinner. Wish you all a merry christmas and blessed new year 2014 ^^


Sunday, 8 December 2013

Ladybug Steam Cupcake

Well is the time of year , where everyone is rushing to get pressie, prepare food , arrange for holidays .  To want to end the year more foodfull , and have the celebration mood to journey forward to New Year.

Staying in western country, Christmas is a big event for everyone. In US the celebration kick start from thanksgiving in November till the new year. I used to fantasy on how Christmas will be celebrated in western country. The movie seem to project such romantic event with the love one and snowing whole days, nights and months.  Well, sorry Australia is summer during Christmas . How people celebrate Christmas in this country is not romantic at all. Is very family , we tend to have BBQ at the back yard and beers and hot hot weather.  So maybe should a white Christmas will make some different ? Not sure has yet to experience it.

I try not to get too involve on getting present and eating ourselves silly as years goes by. Honestly that is lot of time the present we give or get might not be the one people like. All the people I knew of, are very blessed and have house full of things . This should be a season to bless those who really in need. So I want my Christmas to be one that is give to the needy not to top up others store room .

Every year my church will have an event for the children to know the true meaning of Christmas->Christmas for Kids ( C4K). This event has run for 10 years and we really want to bring the love of GOD to community that has struggle or needs in life.

So I participate in baking Cupcake for the little one. I found this recipe from the website , which I knew the children surely will love the print on this cake . I hope by enjoying the cupcake it will bring some joys to this special day for them .

The recipe I used and modify  is from ->My Little Favourite DIY

Ingredients :

3 Cold Eggs
275g Plain Flour
3 tsp baking powder
150ml Fresh milk
1 tsp ovallette ( I cant find this in Aus, I replace with 1/2 baking soda)
220g Castor Sugar ( can be reduced)
1 tsp vanilla essence
1-2 piece of dark chocolate ( melted by double boiling )

Method :

1) Place the egg and sugar in a mixing bowl , beat till fluffy and creamy , reach ribbon stage
2) Mix in 1/3 of the flour in the egg mixture till combine, pour in 1/2 the milk portion. Follow by another 1/3 of flour then 1/2 milk portion and finally pour in the reminding 1/3 flour in the mixture and combine well.
3)Take 1 Tbsp plain mixture and put into a piping bag
4)Take 3 Tbsp plain mixture , mix with dark melted chocolate and put into pipping bag .
5) Colour the rest of the mixing with bright red and put into a piping bag
6) Pump the red color mixture into the cup about 80% full .
7) Draw a cross with the chocolate mixture and do dots on both sides. Color the upper half of the cross with chocolate mixture.
8) Make 2 plain dots as eye and filled 2 small dots in the plain mixture as eye balls.
9)Steam with medium high heat for 10-12 min. Remember to cover the steamer lids with tea towel. You do not want the water condense to drop onto the cake.


As I do not know how should the texture and the taste of the cake with ovallette inside. Is hard for me to know what I did is successful or the cake should be more moist then this.

I do a pre run batch before the actual baking events. And put some strawberry jam in the cake as fillings. However the jam melted and leak out from the bottom of the cake and make it wet . Where I omit the jam but instead filled with some chocolate chip instead..

The cake is moist and is not as chewy as I thought it will be . The texture of the cake is sort of like chinese fa kueh. Thank GOD the texture is not like the chinese style steam cake.

What is the let down when I did that for the big batch. The cup cake liner I used seem to be bigger which I do not notice it. Until I start steaming the cake it takes longer than my pre run. The cake folor fade and some of the print fade as well.


Lesson learnt - Do not fill it too full , as the longer the heat to steam it will cause the color fade and the cake will surely crack! Is a hard lesson , but I will be more careful next time when it come to cake steaming.


Saturday, 16 November 2013

ANG KU KUEH ( Purple Sweet potato)


I love all type of Nyonya Kueh . Is not from my heritage. However staying in Asia we do have different mixed of cultural group staying harmony together. Peranakan is another cultural group with full of strong favour taste of food and snack.

Ang Ku Kueh is one of the snack that is our tea moment snack. It has many version and filling. For this snack I love the peanut fillings. Some recipe will iincorporate coconut milk in it. Which will really enhance the fragrance of this kueh and trust me everything that has coconut in it taste the best.

There are so many Ang Ku Kueh recipe in the internet and for this recipe I follow this link -> HoneyBeeSweets.


Purple Sweet potatoes Kueh

Ingredients

100g Purple Sweet potatoes
150g Glutinous Rice Flour
1/2 Tbsp Rice Flour
1 Tbsp Sugar
1.5 Tbsp cooking Oil
100ml Water or Coconut milk ( I used coconut milk)

Method :

1. Place all ingredient expect coconut milk in a large mixing bowl.
2. Slowly add in the coconut milk to the form a soft dough ( not wet). Cover it with cling wrap and rest for 10min.
3. Divide the dough into small portion and gentle press it flat on your palm.
4. Scoop the filling in the center and seal it. Roll it into a ball shape.
5. Press the dough with filling into the mold grease with oil.
6. Knock the kueh out from the mold and place it on top of a banana leafs.
7. Preapare a steamer and steam the kueh for 6-8min. Depend on the size of the kueh.
8. When the color of the kueh turn lighter it indicate the kueh is cooked.
9. Take it out from the steamer and cool it .

Peanut Fillings

Ingredients

350g Peanut ( The peanut I bought is without skin)
60g Caster sugar

Method :

1. Roast the peanut in oven for about 20min in 180C .( You can slowly pan fired the peanut till roasted)
2. Blend the peanut with the caster sugar.
3. Let it cool down before used for fillings.


As I grease the mold with oil , I did not brush oil before steaming the kueh. You can brush the kueh with oil before steaming it will prevent the kueh from sticking together and make the surface look glossy.

The texture of the kueh is soft and the coconut milk add frangance and it taste yum. I simply love the nature purple from the sweet potatoes. It make this kueh more appealing and just good for an afternoon snack .


Tuesday, 5 November 2013

Curry Chicken Bun


Another bread moment. I am looking at recipe that is easy and with great result. Baking bread is really time consuming. The time used for proofing and roll and wait for another round of proofing. I am a carb person I must admit. I love rice and really learning to cut down as much as I can . And learn to eat healthy grain .

So this time am looking for an easy and healthy bread recipe I come by this one of the food blogger of my favourite is ->SiewHwei's Kitchen.The recipe has portion the time to proof and interestingly it has a proof dough which was proof in the fridge overnight and added in the main dough on the next day. Well it might be a method some of you had known it for awhile, but again as an ametuer this is the first time I baking bread using this method.

Here are the recipe I have followed :

Ingredients :

Overnight dough (中种)

214g Bread Flour
128g Cold Milk
2g Instant Yeast


Method :

1. Mixed all the ingredient till combine and leave in room temperature to proof for 4-5hours OR
    Leave in a bowl cling wrap it refrigerate 14-16 hrs.

I have this prepare overnight and let the dough sit in the fridge for that long .

Main Dough

Ingredients :

42g Bread Flour
50g Wheat Flour
25g  Milk
30g Whole Egg
3g   Instant Yeast
5g   Salt
35g Brown Sugar
12g Milk Powder
30g Unsalted Butter

Method :

1. Tear the overnight dough into pieces and mixed with all the ingredient in main dough except unsalted butter.
2.  Combine all the ingredient well with mixer using bread hook. Add in butter continue to beat till well mixed and the soft dough has formed. ( Pass through window pane test)
3. Let the dough rest for 10 min. Cut the dough into small portion weighing 40g each portion, roll in ball shape and rest for another 10min
4. Flatted the dough, spoon a tablespoon of curry chicken filling in it. Seal up the dough and roll into ball shape.
5. Line the baking tray and have the bread place in the tray and let it proof for another 60min.
6. Preheat oven 170C.
7. Once proofing is done , brush the bread with egg wash and bake the bread for 10-15min.


As for the curry chicken filling please refer to my -> chicken curry puff.

The bread is soft, however it does stick on my teeth , I wonder is it baking time too short , or this texture will make the bread soft. I guess is healthy to use some wheat flour in the bread. I am looking for wholemeal bread recipe so to have a more healthy version of bread I love to consume.


Give this a try and if you visit the original website for this recipe, you will see she do it all in small batch as tea and snack for her son.

Happy breading again :)

Thursday, 3 October 2013

Orange Creamcheese Cake


I make this cake by order. A friend of mine celebrating a beautiful young lady birthday. As I do not have full set of cake to display and for them to choose what cake they can order. Always they will allow me to do my own research and have a theme for me to create/make something that will surprise them .

So the order is simple yet can be tricky. She love cheesecake and orange is her favourite fruit. :) Well I do have one cake that I would love to try out and bake in this theme. I am happy to take up this order and have this cake make for their special occasion.

I have been reading this young lady blog for awhile. I find her really talented. I guess she must have some sort of experience in western pasteries café. The picture and the cake she make was so stunning and above normal standard. The plating was just like fine dining desserts.

This is one of her cake I would love to make. There is a couple of it , I would love to try out in future. I do not have confident to deco the cake like some of hers. It really take time and patience to create cake as such . She is now lodging her first Icook book in Ipad. I have downloaded and it is really great and easy to follow.

Do drop by her blog and the recipe I used for this cake is here ->Yue's Handicrafts

It has few step for each layer. Though the recipe might looks long, however is not difficult to follow. Is quite an easy attempt for cheesecake .I have modify the recipe according to what I can do :)

Make for a 8" round cake ( serve 10-12 pax)

Sponge Cake ( using my Lychee Lime Yogurt Mousse Cake sponge cake )
Half the portion as I only need one layer.

 Ingredients :

40g Cake Flour
1/2 tbsp Corn Flour
13g unsalted butter
18gmilk
100g eggs ( 2 large eggs)
10g egg yolk
30g caster sugar
1 tsp of orange zest (option as this cake should be full of orange smell)

Method :

 1. Preheat oven to 170C degree
2. Place unsalted butter and milk together in a bowl using double boiling method to melt the butter and combine well with the milk.
3.Combine egg and egg yolks with caster sugar in a mixing bowl . Place the mixing bowl on top of a pot of steaming water, avoid the base touch the warm water. Beat the egg mixture with the hand held mixer
4.Continuing beating the egg mixture and be careful not to cook the egg mixture, used your finger to test the temperature of the egg mixture, when is warm take the mixture away from the steaming water.
5. Beat the egg mixture till pale and thick in volume. If you can draw a line with the mixer and the line will not disappear then is done.
6.Fold the flour into the the egg mixture with spatula in 3 separate portions.
7.Take a small portion of the above mixture mix well with the butter milk
8. Pour in the well mixed butter milk and the orange zest into the cake mixture and combine until well incorporate.
9. Pour the cake mixture into a greased 7" round mould. Bake for 15-18min in the preheat oven or until the stick come out clean
10. When done baking , let the cake cool in the mould and take it out, set aside for later use.

Crust Base

Ingredients

140g digestive biscuit
60g unsalted butter ( melted)

Method :

1. Break the biscuit into fine crumb and mix well with the butter.
2. Press evenly into the 8" spring form round mould .
3. Refrigerate at least 30 mins.

Orange Jelly layer ( Top layer)

Ingredients

1.5Tbsp gelatine powder
8Tbsp water
600ml orange juice ( I used bottle orange juice that is pure)
60g sugar ( original recipe 75g)
3tsp of Cointreau ( I do not have so omitted)

Method :

1. Pour water in a bowl, sprinkle gelatine powder on it , let it bloom.  Place the bowl in a bowl of hot water allow the gelatine to melt.
2.Combine 200ml orange juice and sugar in a saucepan, bring it to boil.
3. Remove from the heat , pour in gelatine mixture , stir till smooth
4. Add in the remaining orange juice , stir well.
5. Set 400ml aside for the filling and 60ml for brushing the cake & the remaining for the top layer.

Orange Cream Cheese Filling

Ingredient

250g creamcheese
4tsp of Cointreau ( I do not have it so omitted)
400ml orange jelly , warm ( from the above step)
300ml Whipping Cream

Method :

1. In a chilled metal bowl, beat the whipping cream till soft peaks. Place in fridge for later mixing
2. In a mixing bowl, beat the cream cheese till smooth , add in orange jelly in small portion and continue to beat till smooth.
3. Fold the whipping cream into the cream cheese mixture. Till well combine

Assembly :

1. Put the sponge cake onto the prepared spring foam tin ( with the crust base in it)
2. Blush generous amount of orange juice on the sponge cake.
3.Pour in all the creamcheese filling.
4. Refrigerate to set. ( Allow 1hour setting)
5. Lastly carefully pour the orange jelly onto the creamcheese layer.
6. Refrigerate to set ( overnight)
7. Decorate the cake as your liking

When I attempt to make this cake, I was concern while waiting for the creamcheese to set the orange jelly might get solidify. However this will not happen, as the gelatine will not set so fast in the room temperature . If you worry, just stir the orange jelly mixture on off to prevent it to set.

The verdict is satisfied customers. They love the taste of the cake and the orange is strong to the birthday gal liking.


This cake is kind of simple though the step seem long. Give it a try you might impress those who love orange and cream cheese.


Wednesday, 25 September 2013

Pandan Coconut Milk Layer Crepe Cake


When I find out that is a pandan baking theme this month. It really excite me. I love anything to do with pandan, palm sugar and coconut milk. I always see this as a blessings from GOD to the SouthEast Asia regions. There is a lot of herbs around the world yet this 3 ingredients can produce varieties of desserts and savoury food . 


I planned to make Kuih Tako. However it seem to happen in such a way when you want something in shop you always can not find it , when you do not want it , it will just keep flashing in front you. I have saw and bough fresh pandan the past few months. When it come to this month, NO ! I just can not find any trace of pandan leave or even the frozen one. This is just upsetting! I have few frozen one in my freezer but is just not enough for me to make Kuih Tako .

So with the spirit of not giving up. I come by this recipe which seem interesting. So I decided to have this modify to Pandan version. The original recipe is from ->My little Favourite  ( which is one of the host for Pandan theme)

So here is my version of Pandan Coconut Crepe Cake.

Ingredients :

Pandan Coconut Milk Crepe
 
1 cup Plain Flour
1/3 cup Caster sugar
1 tsp Pandan essence or 1 1/2 Tbsp Pandan Juice
4 Eggs
350ml Milk
150ml Coconut Milk  ( you can varies to your liking)

Nob of butter for greasing the pan

Method :

1. Whisk eggs , milk and coconut milk in a jug . Combine the pandan juice well in it .
2. Sift the flour and sugar in a big bowl. Make a well in the centre , gradually pour in the egg, milk mixture in it.
3. Stirring gently with a whisk to combine ( do not beat) . As not to incorporate air in it.
4. Heat up a 20cm flat round pan. Grease with nob of butter.
5. Fill a 1/4 cup measure to about 2/3 full with batter. Pour into the centre of the pan and swirl the pan around to evenly cover the base. Cook in medium heat ( depend on your stove heat) about 1min. turn it to low and flip the crepe over to cook further 30 sec.
6. Place in the wire rack to cool once is done.
7. Repeat the process till all batter finished.
8. Stacking the crepe on top of each time nicely each time it has cool down on the rack .

This recipe yield for 20- 25 piece of crepe ( this is how much I have made with a few damage one in between)

Fillings ( I did a Coconut cream to go with the pandan crepe)

Ingredient

200ml Whipping Cream
2 Tbsp of sour cream
1 Tbsp of coconut milk
1 Tbsp of caster sugar

Method :

1. Use a cold metal bowl beat the whipping cream with sugar to soft peak.
2. Mix in Sour cream and beat to combine.
3. Pour in the coconut milk and fold to combine
4. Chilled in fridge before use

Assembly

1. Put a piece of crepe on the flat surface
2. Used the back of the spoon to gently coat the creamy filling in a thing layer over the crepe.
3. Place another crepe on top neatly, continue the process till all finished.
4. Chilled in the fridge in a container , till serving time cut into wedges and enjoy.


Do not chill too long as it will dry out the surface of the crepe cake. I guess I have spread too little cream in between the crepe cake. Next time if I make this again will spread it sparingly. Just thinking out loud maybe I can do a vanila crepe cake with durian cream. It will be a great combination too .

I am submitting this post to Little Thumbs Up September Pandan Hosted by Joceline@ Butter, Flour & Me, organised by Zoe@ Bake for Happy Kids and Mui Mui @ My Little Favourites DIY


Am excited to see so many pandan dishes and creation . Thanks for organising this ladies.

Hopefully you like what I have "created" . Have a great pandan experience.

Thursday, 19 September 2013

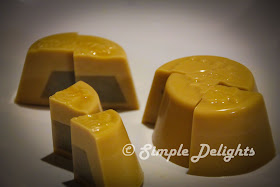
Jelly MoonCake - Palm Sugar with Red Bean Paste


I really wanted to try make some Jelly mooncake this year. This is one of the mooncake we have in Malaysia , it started few years back and it has become a trend. Instead of getting the traditional mooncake , people are getting the colourful mooncake for the celebration. I can understand the reason of it, first, in hot weather , chilling stuff is always welcome. It is also something different from the traditional style and we can have more variety in jelly mooncake . The mooncake is pretty and is seem lighter to many as well.

I do not have the jelly mooncake mould. However I do want to have a try on this new style of mooncake for one of my Mid Autumn festival celebration dinner. So I use my other cake mould to have this cute little jelly mooncake in a more cartoon design.

Thanks for one of the friend , who went back to HK early the year and grab me this little cute mould . The effect is good and I am sure nobody has any objection in having some cartoon style mooncake :)

The recipe I used was in this blogger ->Frozen Wings

I mixed her 2 recipe to make my jelly mooncake. One for the skin and another one by the fillings (Red Bean)

Ingredients :

For the Fillings :

150g red beans paste ( cook the red bean and mashed/blend  it)
350ml water
80g caster sugar (original recipe 100g)
2tsps agar agar powder
1/2tsp instant jelly ( I do not have instant jelly so I omitted this)
1 blade pandan leaves (knotted)

100ml coconut milk
1tbsp cornflour, dash of salt
( have coconut milk with corn flour and salt mix together )

Method :
1. Combine all the ingredient except the coconut milk mixture together.
2. Bring the red bean mixture to a boil and add in coconut milk mixture.Let it come to another boil.
3. Turn heat to low, cook for further 2 mins. Turn off heat, remove pandan leaves.
4. Pour the jelly mixture into the  smaller moulds till almost full . Leave it cool and set , this can chilled in the fridge and prepare one day before.

Dislodge the fillings before proceed to make the skin.

For the Skin :

Palm Sugar mooncake skin  ( I choose this as the color is more towards traditional mooncake)

60g gula melaka ( chopped small )
20g caster sugar ( original recipe is 60g)
4tsps agar agar powder ( depend on the strength of the agar agar powder , I reckon read the instruction and adjust accordingly)
400ml water
250ml thick coconut milk

Method :

1. Put everything in the pot and bring it boil.

Assemble of Jelly Mooncake

1. Pour a little of the skin mixture in the mould and let it half set.
2. Put in the red bean fillings that have already set earlier
3.Pour balance of the skin mixture into the mould till the brim
4.Let it set and chill in fridge .

To unmould the mooncake, soak the mooncake in the mould with some warm water this make it easy to unmould.


I guess the contrast of my mooncake color is not that great as both filling and skin is both dark color. Next round I would definitely try other colourful Jelly mooncake. I hope I will have the right mould next year :)

Happy Moon Cake Festival.

Sunday, 15 September 2013

Piglet mooncake and Happy Mid Autumn Festival


I did my first batch mooncake last year. However I did not manage to blog about it. Too many things happened and I am not sure have I done it right and I did not do a lot . One of the fail is the Shanghai Mooncake I tried last year. Too much of parmesan cheese and I find it too strong the smell and I can not eat it myself.

I did the filling last year with purple sweet potatoes and taro paste. However I do not think I have cooked them long enough hence the paste seem to be watery and my mooncake does not last too long. Well is all a learning process.

This year I decided to buy some lotus filling and have it started early . So the moon cake has enough time to "breath" to become moisture and oily. 


I did not make the snowskin mooncake this year, as I realised snowskin is not so much of my fancy, (rather I did not get the skin texture right).However I did the Jelly Mooncake and the Piglet mooncake. Of course the Piglet Mooncake is none but Anncoo style. It was so so cute. When I first looking for recipes , I saw her blog ,however for some reason my Ipad can not seem to load the slide show. I can not figure out the whole process of the making. So I make my own style . HaHa not too bad for a total novice :)


When I finally got to my PC and reload the page - there was the step of this cute little piglet mooncake. It seem to have create a fad of making this among the blogger. My piglet is a bit dark. Ya I sort of bake it too high and maybe a little over baked. My dear has been asking me during the baking session, " It seem burning! " , " Do you want to have a look ." "I think is time to let it out" . My respond is " Oh ya, is fine " ," No worries" . Ok that is the consequences of being err lazy !!


For the Mooncake Recipe I follow ->Christine Recipe . It works well for me and easy to follow . I did not put egg yolk in my mooncake and I bought the Lotus filling from the store.


Ingredients : ( I have double the portion )

200g Plaim Flour
120g Golden Syrup ( Store bought , it was sell in Coles in Aus)
1 tsp Alkaline water ( Lye Water)
56g Vegetable Oil

Fillings :
840g Lotus Paste

Egg Wash :
1 egg yolk and 2 Tbsp of egg white

Method :

1. In a large bowl , mix in golden syrup, alkaline water and oil well to combine.
2. Sift in the flour , using a spatula to combine all ingredient. Be careful not to over mix. . Knead the mixture into a soft dough. Cover with film wrap and let it sit for 40 - 60min.
3. Divide the dough into equal portion ( as per your mold size) . There is various of ratio you would like to follow to your own liking. ( See note below )
4. Divide the filling paste into equal portion as per the dough divided portion. Roll into ball shape.
5. Preheat the oven to 170C .
6. Roll each dough portion to a thin disc on top of a plastic film wrap. This is to prevent the dough on sticking on any surface. Place the filling into the dough paste and wrap it nicely and shape into a ball.
7. Oil the mooncake mould, gently place the stuff mooncake in the mould, press it with firm pressure to ensure the print is moulded to the mooncake.
8. I tab the side of the mooncake mould and remove mooncake from the mould . Place it on the baking tray.
9. Repeat the step till all the dough has finished with nice print.
10. Bake in the preheated oven for about 10 min . Brush the mooncake with egg wash, let it rest for 10 - 15 mins. Return to the oven and make for another 10-15 min with 160 C .

Once the mooncake has finished baking, it does not look right or good. It seem to be cracking and dry. Do not panic, this is normal. The mooncake need to be kept in air tight container for 4-5 days , to let it "breed" ( this is what I called) in order for the oil and the moist to release and you will have a nice coated golden brown mooncake to enjoy.

This process is important , as it make the pastry soften, fluffy and moist to enjoy .

Step of making the piglet. You can follow the link in Anncoo ( Snowskin version).


Ratio of the mooncake :
Dough : Fillings

1. For the small mould my ratio is 15g : 35g
2. For the bigger mould my ratio is 30g : 150g
3. For the piglet mooncake my ratio is 20g : 50g

I have a few different filling for my mooncake this round Lotus, Red Bean and Chestnut. Love the taste of chestnut and is best to get those less sugar . If you read on the calories of each mooncake , at time it really stop you from eating.

I will post my Jelly mooncake in another post.  Wish everyone a Happy Mid Autumn Festival.


Wednesday, 4 September 2013

Blueberry Mirror Cake & Strawberry Mirror Cake


The birthday moment. I knew blueberry is my friend's favourite. I always love to celebrate other birthday as a family. Though I only knew this couple when they move to Australia. However I believe there is no meeting by co-incident. GOD always bring forth people to bless us or share our blessings to another. So this time I created this mirror cake by using my friend favourite fruits - Blueberry. The effect is not bad, as you can see from the picture, it does have the shining effect of the mirror and good enough to reflect the image of the candle light.


Thiis cake is quite a small size , it will be just nice for a group of six people. But we only have 4 adults and 1 little gal to enjoy :) As always the birthday gal got to bring back the rest of the cake to enjoy it.


On the same week I make a larger Strawberry Mirror Cake by order. The recipe I used is the same as my last recipe ->Strawberry Mirror Cake. This is a birthday cake for some sisters in my group. I suppose pink always suit the gals better and I knew one of the gal love strawberry ( too bad she was not there that week). I decorated the cake with some raspberry instead of strawberry , it does cause some confuse as everyone thought this is a raspberry cake! Raspberry can be very expensive at time, to use the amount of raspberry to make this cake I guess it can be quite expensive.


The verdict? The cake is very yum and very welcome by everyone , we have children come and ask for a piece of cake from our group during the celebration. Of course we can not reject the children, but we do try to cut it as slim as possible so everyone has a slice of it. The lightness and the berry taste just so refresh and is a good a dessert after a full meal lunch.

Thursday, 22 August 2013

Durian Cream Puff


This so call  "easy " pastry - cream puff has actually take up lots of our effort and few painful attempt.Why is it painful? When the puff is not puffy and is not what you expect , all the effort go in drain..

I have not done this before. The last time when we have a home made cream puff was done by my love . After he has done the best cream puff ( according to his own judgement) , he told me this is an easy pastry that he could handle it. My oh my , when your memory play you out and you thought you are right , it turn out that is a lesson for us to learn .

So one fine day , we have some friends over for dinner . Run out of time , we want to make some desserts that is "easy" and in a short period of time, we decided to make cream puff. Little do we know , we totally forget about how the texture should be like and what the dough should be right for the whole cream puff thingie.

The pain started when incorporate the egg into the dough , without mixing in well , we put in more flour. As we knew the dough should not be so watery. Doh ! mistakes no 1. Then we cant pipe it and is like a cookies on the baking sheet. So we make another batch, the other pain started , when mix in the flour to the butter , how the texture should be? ( At the point we have not learn the problem is the egg did not incorporate well , we thought the mistakes was in the mixing of flour into the butter) . Doh ! another mistakes no 2. All in all we make 3 batches and only the last one seem to be right. Well we are not happy with the result but our guest is happily eating all the small parthtic puff. Arghhh.

Ok failure will only make us strike to get this right. Finally , after all the search and understand and realised where are mistakes was. Here is the cream puff that we both knew was RIGHT !

I am submitting this post to -> Aspiring Bakers #34: Choux Party (August 2013) hosted by Jasline of Foodie Baker .

Recipe from ->NasiLemakLover

Ingredients :

100g butter
250ml water
150g flour (all purpose) + a pinch of salt
1/2tsp vanilla essence
1/4tsp baking powder
1tbsp sugar
2-3 eggs (I have the egg incorporate one after one. On the last egg I have it beaten in a bowl and slowly add in to test the consistency and adjust accordingly , this seem a better way to have the better batter of the dough)
reminding egg can be used as egg wash to brush on the puff before baking

Durian cream

Blend Durian meat 300g
Whipping cream 200g ( beat the pouring cream till soft peak)
* mix both together and chill in the fridge
Method :

1. Mix flour, baking powder,salt and sugar in a bowl and  set aside.
2. Melt butter in a pot with medium heat, when butter start melting add in water and  mix well.
3. Add in flour mixture quickly and vanilla essence mix well till a soft dough form and  turn off the heat. The dough should be soft and shinning.
4. Set the dough aside let it cool down but not completely cool.
5. Mix in the egg one at a time and whisk the dough till the egg incorporate well.
6.Mix in another egg and continue the process. The amount of egg added in can be adjusted , the consistency we are looking for is a soft but not watery dough.
The test to use here is when you put some dough between 2 finger you can stretch it to a line and it will not break and still soft.
 7. Place the dough in a pastry bag fitted with a tip. Pipe quarter-sized puffs about 1 inch apart on a baking pan line with baking paper.( I put the dough in a ziplock bag and cut a small hole at a corner , I find this a lot easy to work with )
8. Brush some egg wash on your cream puff .
9. Bake at pre-heat oven at 180C for 25mins or until golden brown.

Once the puff is done , take it out from the oven cold it and pipe in your durian cream . ENJOY !


Yes finally we got this right and the puff is yum , only good puff deserve the durian cream . ( As I told my husband , I do not want to waste my durian on lousy puff)

Hope this is a good guide for you to try out the cream puff making.

Tuesday, 20 August 2013

Japanese Style Bacon and Cheese Bun (Tang Zhong Method)


Another bun moment . I have my mixer replaced. Is such a shame when the mixer broke down after I make this bun . It was a gift for my last year present, apparent the model is not that powerful to handle bread dough . The mixer died half way of my making. Thank GOD, I have another old old "Kenxxxx" brand mixer to help me to finish off this bread . Since it was within the warranty period, we can get another replace. However understanding the model was not suppose to knead heavy dough I upgrade it to another higher version.

Allow me to whinge, the brand "Brexxxxx" is quite misleading, when my friends bought the mixer for me , on the manual it did show it can knead dough. Well how misleading those manufacturer can be. Just so totally not right for this whole things to happen. Ok I shall stop here, GOD will surely bless me with a KA soon :)

Come back to this lovely recipe ->Christine's Recipes. I love all her baking and cooking. The picture is neat and the instruction is very clear. Some of it come with a step to step picture and you will not missed it. The result is always good and yum.From her blog I leanrt a lot of different method of TangZhong. I am not too fuss on the name but I do know there will give variety of result , one just need to know what is your preferences.

So here is the result of this “65°C湯種麵包” by Yvonne Chen 陳郁芬. I will leave with you to read on her blog where she explain the TangZhong and how to mix in variety of different bread.


I used her recipe to do this Bacon and Cheese Bun. Of course sharing is loving , so this bread has been share with my love friends and they all enjoy it as breakkie.

Ingredients

TangZhong

50gm Bread Flour
250 ml Water ( I used 50/50 milk and water portion as mention in her recipe)

Bread :
(I double up the version of the recipe to make more buns)

700gm Bread Flour
90gm Caster Sugar ( original recipe is 110g I always reduce my sugar)
2 Tsp Salt
112g Eggs ( 2 large eggs)
14g milk powder ( I did not have milk powder so I did not put )
250ml Milk
250g TangZhong ( all the above)
12g Instant Yeast
60g Butter ( cut into small pieces)

Fillings : ( as per your own preference)
80-100g Bacon
80 - 100g Cheese

Method :

Making TangZhong

1. Mix flour in water well until no lumps. Place in a sauce pan cook over medium-low heat, stirring consistently with a whisk to prevent from burning and sticking while cooking.
2. The mixture will eventually become thicker and thicker . Once some lines appear in the mixture for every stroke you make with the whisk, the tangzhong is done.
3. Remove from heat and transfer to a clean bowl. Cover with cling wrap sticking onto the surface of tangzhong to prevent for drying up. Let it cool , this can be used straight away once it cool down to room temperature.

I cooked this one night before and stored in the fridge , the next day while preparing my bread I have this took out from the fridge and let it get back to room temperature before using.

Making Bread :
( I used standing mixer to knead my dough )

1. Place all the wet ingredient in the mixing bowl including the tangzhong except the butter.
2. Put in all the dry ingredient Bread flour, sugar, salt , milk powder ( if you used it ) in the wet ingredients. Make a well in the dry ingredient and have the instant yeast place in. And start to knead the dough with a dough mixer. Start off with lower power till all ingredient well combine it might take about 10mins.
3. Once the dough is in dough shape and gluten has developed, put in the butter for continue kneading. At this stage the power of the mixer can be increase and combine to knead till the dough is smooth and when you stretch the dough it will forms a thing "membrane" or pass through the window pane test.
4.Knead the whole big dough into a ball shape. Place in a greased metal bowl and cover with cling wrap . Let it proof till double its' size . It takes about 1hour. ( I have mine place in an oven with a cup of hot water, this help the proofing better and faster)
5.Transfer the 1st proof bread in a clean floured surface. ( I do notice this bread is more sticky than usual) Deflate and divide the dough into each 70g portion. Knead into ball shapes and cover with cling wrap and have it rest for another 15 -20 min
6. Roll out each portion of the dough with a rolling ping into a oval shape. Sprinkle bacon and cheese evenly as much as your liking. Then roll once again and have the seals face down. ( I have it shape in different shape)
7. Arrange the rolled-up dough in a greased/ line on baking paper. Leave it for 2nd round of proofing , it takes about 40-45 min, until the dough rises up to 75% of the original size.
8. Preheat oven to 175C. Brush the surface of the bread with egg wash. Bake in the oven for 30-40min. It depend on the shape of the bread you making , if you put the bread in the tin it will take longer time.
9. Once is done, transfer the freshly bake to wire rack and let it cool completely.


We have the bread while it still warm , is hard to resist the smell of bread when is warm and the aroma is full in your house. The reminding can be kept in airtight container.


Indeed this bread still very very soft even after 3-4 days. I guess the cheese does help to maintain the softness in the bread. And is the best bread by far I love from my own baking. If you love bread , I guess this can be a good basis dough and from there you can make it to any other filling of your bread. Well, try this out and happy "bunning " :)


Wednesday, 7 August 2013

Raspberry Hokkaido Chiffon Cupcake


Hokkaido is a very beautiful place in Japan. This place will always have a special place in our heart. We have our honeymoon in Hokkaido. Our first encounter with snow , it was said Hokkaido snow was the most beautiful as it was not polluted and fine like caster sugar. Imagine you have sugar rain on you. It just melt as you start touches it. How does it taste like ? Nothing! How do I know? Ya out of curiousity we taste it ! Well , you got to do silly thing here and there in life. At least we have lots of memory in our honeymoon.

So when I come by this recipe with the word chiffon , it is hard not to draw my attention . The pink is so beautiful and it just so suit for a gal afternoon tea and brighten one day . Instead of doing the -> Strawberry Hokkaido Chiffon Cupcakes. I change it to Raspberry Hokkaido Chiffon Cupcakes. The pink is more red on my version and of course this must go in a pink cupcake mold.


So below are the recipe I used and adapt from the original link ( as above)
I made 9 cupcake for my mold size


Chiffon Cake
 
Ingredients


3 egg Large ( separate yolk and white)
20g Sugar
30g vegetable oil
60g milk
70g cake flour

25g Sugar ( beating with the white)

Raspberry Cream
100g pouring cream
10g sugar
60g raspberry puree ( I used frozen raspberry and blend it to puree)

Method :

1. Pre heat oven to 170C degree
2. Line baking paper on baking tray
3.Whisk the egg yolk and sugar till pale with a hand whisk.
4.Pour in vegetable oil and milk combine well
5.Sift in cake flour, combine well and put aside.
6.Beat egg white with hand held mixer till foamy and add in sugar gradually and continue to beat till soft peak.
7. Fold in egg white to egg yolk mixture in 3 portion .
8. Scoop the batter into the cupcake mold about 90% full,
9. Bake for 20-25 min ( I put in lower rack , depend on how your oven function )
10. Beat the pouring cream in a cold metal bowl with hand held mixer till soft peak form.( I add 1Tbsp of caster sugar in as raspberry can be quite sour)
11. Add in the raspberry puree and combine well. Chill the raspberry cream in fridge and used it when cupcake has cool down .
12. Once cupcake is done and cool down. Pipe the raspberry cream in and decorate with fresh raspberry .
13. Put in an air tight container and refrigerated before serve.


I make this for myself. Love the color and the soft texture of the chiffon cupcake. I share this with one of my best family in Australia as an appreciation of their care and love for us all time.

It was so so refreshing the cream and the cake is soft. Taste is super yum. My love one seeing this beautiful cake can not resist and have some too . Is hard not to share when he is your love one.


And yes the cream is basically overflow and we think we stuff in too much for the first few. However it all goes well to our tummy :) Again another healthy cake , the size is small and it contain fruit ^^.

Simple good dessert for a peaceful night. Try this , is simple and impressive. Honestly who will resist a beautiful cupcake .


Thursday, 1 August 2013

Strawberry Yogurt Cake


It just make you feel so great when people like what you are doing and appreciate the work of your hand . I have a friend who love my cake and place an order for someone birthday celebration . Not too sure what exactly they will love , is always best to use the ingredient that is fresh or in the season.

Yes is winter in Australia. How different is it when we have winter in the middle of year and the rest is summer hot hot . Since is winter we will have all the great berry fruits . I asked my friend what fruit she preferred , strawberry or blueberry. She choose strawberry as her daughter love that fruit. I always touch by the heart of a mother, as I knew blueberry is my friend's favourite.

So this is the beautiful cake that I have make and I follow the recipe from ->Table for 2 Strawberry Yogurt Cake

Ingredients

3 layer of Sponge cake ( I used my sponge cake recipe ->Lychee Lime Yogurt Mousse Cake
( I used a 6" round cake mold)


Filling

600gm Strawberry yogurt (original recipe is 500g , mine is a 3 layer cake)
200gm Whipping cream (Pouring cream) ( + 50g of whipping cream on decoration )
1 3/4 Tbsp of Gelatin
65ml water

Method :

1. Put water in a bowl , sprinkle gelatin on top . Let it bloom and heat up in microwave for 30sc or let it sit in a bowl of hot water to dissolve the gelatin.
2. Beat the pouring cream with hand held mixer in a cold metal bowl till soft peak.
3. Fold in the whipping cream in the strawberry yogurt ,combine it well.Sprinkle the gelatin in and incorporate it well to the yogurt cream mixture.


Assemble the cake :

1. Place one piece of the sponge cake in the 7" spring foam cake mold.
2. Pour in 1/3 of the yogurt mixture in . Smooth the surface.
3. Place second piece of sponge cake on top of the yogurt mixture.
4. Pour in another 1/3 of the yogurt mixture in smooth the surface.
5. Place the last piece of sponge cake on the top of the yogurt mixture .
6. Pour in all the yogurt mixture and smooth the surface well . As this will be the top of your cake.

Let it chill in fridge at least 4 hours or overnight.


Carefully dislocate the cake from the springfoam mold . And decorate with strawberry on top.

I have asked my friend to take a picture of the cake and see how was the cake like . The picture is not very clear as was taken outside . But the layer is quite to my satisfaction .


All the girls love the cake and I would say this cake is definitely healthy is YOGURT !!! It just make you feel good to have some dairy in your dessert.

Try it out yourself , your friend will sure enjoy this cake as much as you do .


Monday, 15 July 2013

Cake with Love ( Hidden heart Cake )


Is another fruitful year for me and my love . 7 year of knowing each other. Today , 7 years ago , we first met at UQ sport centre. Who will know that meeting is not a one off but is for a life time. Wow too romantic for a true !!! Ya sort of , at time we still can not believe such thing will happen in us. Being both very practical person in life , we do not believe love at first sight, indeed our love story does not happen at the first sight. Each year when we celebrate the day we met each other , our heart is just full of thanks giving. Is GOD has brought us and bind us in HIS love.

From last year  onwards I promise will start to bake for ourselves in our special day and special moment. We were quite sick the past few days. Just could not shake off the stupid flu cause by the unpredictable weather in this winter. Praise GOD finally with a few night of great rest and lots of water, we have much improve plan to go out for a good celebration within this week.

I have come across this cake few months ago , it was the blogger 9th year anniversary celebration that she bake this cake for her special occasion. Love the idea and the surprise in the cake . Therefore , I decide this will be the cake for my 7th year of knowing each other celebration.

The original cake recipe is for pound cake ->小小米桶的写实厨房。 However I have adapt another recipe for the outer cake ->The Little Teochew. Hence below is the cake from my own adaptation.

HeartShape Chocolate Pound cake

Ingredients :

70g Cake flour
30g Dutch Proceed Cocoa Powder
1/4 tsp baking powder
100g butter (in room temperature)
225g condense milk
100g eggs ( about 2 eggs)

Method :

1. Preheat oven to 170C degree
2. Mix the cake flour, cocoa powder , baking powder together. Sieve it twice to ensure it combine well.
3. Used a hand held mixer beat the butter till fluffy.Pour in the condense milk slowly in the mixture and beat in combine well.
4.Mix the egg in portionly and beat well to the mixture.
5.Fold the flour into the mixture . Pour the cake mixture into a rectangle (20cm x 10cm x 6cm) mold.
6.Bake for 30-35min in 170C degree or when skewer insert come out clear.
7.Unmold the cake after cool down. Used a heartshape cutter to cut the cake into heartshape.
8. Make sure you have enough heartshape to line in the mould

Keep all the heartshape cake in fridge till we need to use

I totally forget to take picture while baking and the cutting. I guess when one is unwell, our strength can only focus at one task instead of multitask.

For the outer layer cake I used another recipe which I think will give a different taste and I was thinking to do some frosting in decorate this cake for my special occasion ^^. After finished the baking I guess it does not need anything extra for the night. Perhaps next time I will try something different .

Orange Butter cake ( I used for cupcake baking)


Ingredient

195g Cake flour
1 1/2 tsp baking powder ( I used 1 1/4 tsp as I do not want it to rise too tall)
1/2 tsp salt
170g butter, softened
120g sugar (original recipe is 225g)
2 whole eggs ( original recipe is 1 large egg, plus one large egg yolk)
1 1/2 tbsp orange zest
6Tbsp milk + 6 Tbsp orange juice ( if you do not want too orange taste can used 12Tbsp milk).

Method :

1. Preheat the oven to 165 C degree
2. Mix the flour, baking powder and salt together.
3. Used a hand held mixer on medium speed, cream butter and sugar till fluffy .
4. Beat in orange zest follow by egg into the mixture.
5. On low speed, add flour mixture in 3 portion alternate with orange milk.
6  On mixer to medium and beat for 10 - 15 sc, just until batter mix well and is thick creamy.
7. Pour 1/4 batter into the prepared pan (I used the same as per above ) , line the heartshape chocolate pound cake in a row. ( please follow the link I forget to take pic , Aghhh )
8. Make sure the heartshape cake fit tight one after another in the tin. Pour the rest of the batter on top of the cake to cover it well.
9. Cover till 80% of the pan so it will not overflow. Bake the cake in low shelf of the oven with 160C degree 30min.Or till skewer come out clean.
10. Once cake is done , unmould it and let it cool before serve or ready for frosting.


I did not pour all the orange butter cake to bake ,I thought it might rise too tall , turn out I should actually pour all in , I make a few small cupcake size cake since I have extra heartshape cake. Well they both taste yum and love the fragrant of orange in the cake.


Well this might be something you would love to try out for your special one on the special day. Is really quite easy and the effect is SURPRISE !

May GOD continue to grow us in loving each other more as we continue our journey with HIM.

It always warm my heart to think back those moment we be together before we tie the knots. Thank GOD for you my love.

Wednesday, 10 July 2013

Lychee Lime Yogurt Mousse Cake


I would say this cake is so beautiful and delicious , however is really a very girlish kind of dessert. Lychee with lime , the sweet and sourish will be love by all girls.Sorry to say that I make this cake for a guy on his birthday and it happened in May ( I am way behind a lot of my blogging ..sigh..). No mean to insult him or anything of that sort. It just me..

I saw this post in nasilemaklover and have been wanting to try it out. I love lychee and knew surely is a good combination to go with lime. To avoid contributing the weight on my love one, I usually do not make fancy cake in the weekday unless we have special occasion to celebrate. Birthday is always one of the great reason to have sweet and fancy cake on the table after the celebration. So despite is a birthday man celebration I still choose to do what I want to do then to do something the birthday man might like :) I often told my friends, sorry is about you in the celebration but is not about you in the cake . Hahahaha I guess most of the man do not mind. At time they do not even mind any birthday celebration. Is just another reason to eat and that is good enough.

So here is the recipe, I half the portion as not many of us in the celebration and I just do not want to overeat . Trust me, we always seem to eat more than we should.

This recipe make a 6' square cake

Sponge Cake - Adapt from swissroll recipe

Ingredients :

80g Cake Flour
1tbsp Corn Flour
25g unsalted butter
35g milk
200g eggs
20g egg yolk
60g caster sugar
1 tsp of lime zest

Method :
1. Preheat oven to 170C degree
2. Place unsalted butter and milk together in a bowl using double boiling method to melt the butter and combine well with the milk.
3.Combine egg and egg yolks with caster sugar in a mixing bowl . Place the mixing bowl on top of a pot of steaming water, avoid the base touch the warm water.Beat the egg mixture with the hand held mixer
4.Continuing beating the egg mixture and be careful not to cook the egg mixture, used your finger to test the temperature of the egg mixture, when is warm take the mixture away from the steaming water.
5. Beat the egg mixture till pale and thick in volume.If you can draw a line with the mixer and the line will not disappear then is done.
6.Fold in the flour into the the egg mixture with spatula in 3 separate portions.
7.Take a small portion of the above mixture mix well with the butter milk
8. Pour in the well mixed butter milk and the lime zest into the cake mixture and mix until well incorporate.
9. Pour the cake mixture into a greased 6" square mold. Bake for 20min in the preheat oven or until the stick come out clean
10. When done baking , let the cake cool in the mold and take it out set aside for later use.


Lychee Lime Yogurt Mousse ( follow the recipe from the above link and half the portion)


Ingredients :
1.5 Canned lychee  (to leave aside few piece of lychees for decoration I choose 6)
20g sugar (original recipe is 60g , I do think not necessary as the canned lychee is quite sweet)
100g whipping cream
60g plain natural yogurt
1.5Tbsp gelatine powder
3Tbsp water
1 key limes zest , 1tsp lime juices

Method:
1.Put 3 Tbsp of water in a bowl sprinkle the gelatine powder on it and let it bloom. Put in a bowl of hot water to have it melt and set aside.
2.Open lychee can and leave aside 6 pieces of lychees for decoration ( or any of your choice).
3.Weight the rest of lychees plus syrup to 350g . I take the advise from the recipe to have more lychee then the syrup. Process them in a food processor, strain lychee puree, weight lychee puree 150g for jelly topping and set aside for later use.
4.Blend the lychee bits again after the puree have been strained with a blender until fine. Add back to the balance lychee puree weight 200g for mousse making.
5.Add sugar into 200g lychee puree, mix well to dissolve. Put in the key limes zest, lime juices and yogurt in the mixing bowl combine well and set aside.
6.Beat whipping cream with hand held mixer til soft peak
7.Fold the whipping cream into lychee yogurt mixture add in gelatine at last and mix well to combine.

8. Pour the mixer onto the cake in the cake pan and refrigerate at least for 2 hours or till the mousse set.


Jelly Topping

Ingredients

150g of above strained lychee puree  

10g caster sugar (original recipe is 30g you can adjust according to your sweet tooth) 1tsp gelatine powder
1Tbsp water
Pink rose colouring (I use Wilton Rose)


Method:
1.Sprinkle gelatin onto the water in a bowl. Place this bowl in a bowl of hot water to melt the gelatine. Leave to cool.
2.Mix sugar with lychee puree, stir to dissolved. Add in gelatine and pink coloring. Pour on top of lychee mousse layer.


Have the cake refrigerate for another 3hours or overnight. Remove mousse cake from cake pan by wrap the side of the pan using hot tea towel. I decorate with lychee and kiwi. I reckon the green go well with the red color.   

The cake is refreshing in term of taste and a slice of it is simply not enough. It does not make you felt guilty if you have a big piece. Possibly because the light texture of the cake you do not mind to have a bigger slice . Everyone love it and what more satisfied is the dinner end well with a good dessert.


I will make this cake in a bigger size next round and perhaps with another layer of sponge cake in between to add the volume to this cake. I am sure this is a good dessert in a summer night.